Key takeaways
- AI-generated characters and environments can often be edited and moved into a standard game engine, but capability depends on the delivered source structure, exchange format, importer, cleanup cost, and rights. Keep an editable DCC master and a separate engine derivative. Validate meshes, materials, textures, rigs, animation, scale, collision, performance, and one round-trip change for every important asset class before production approval.
Often, yes—but only when the AI tool gives you usable source data or a standard exchange file, and only after you test the full handoff. A generated character or environment is not automatically an editable production asset. A flat image may be editable only as pixels. A 3D result may arrive with awkward topology, missing UVs, a fragile rig, merged materials, or engine-specific setup that does not survive export.
For a game artist or world builder, the safest assumption is conditional: AI can accelerate ideation and asset creation, while editability and engine compatibility depend on the delivered file, its structure, its license, and the receiving engine's importer. Keep an editable master in a digital content creation tool, export a separate engine-ready derivative, and validate a difficult sample before adopting the workflow.
“Editable” is not one capability
Before evaluating a platform, define what you need to change later. Different outputs preserve different levels of control.
A generated concept image can usually be repainted, cropped, composited, or used as reference. If it is delivered as a single flattened PNG or JPEG, however, it does not preserve separate character, lighting, background, or material layers. An artist can reconstruct those parts, but that is different from receiving an organized layered source file.
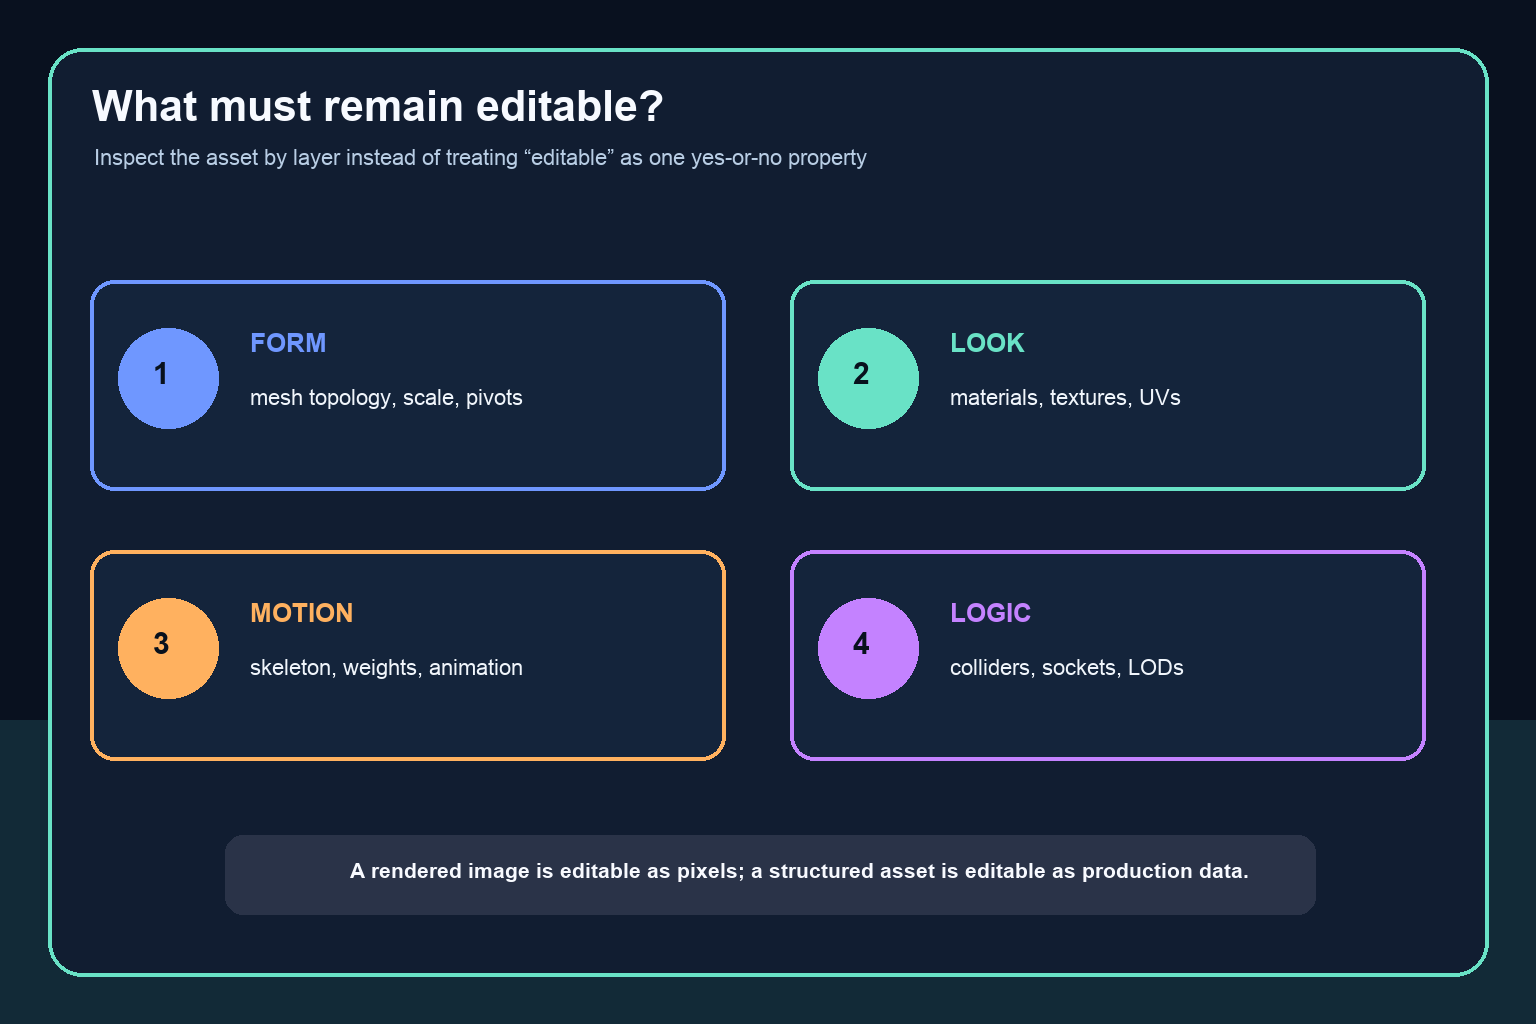
A 3D character or environment has more independent editability layers:
- Form: Can you move vertices, repair topology, separate objects, change proportions, set pivots, and correct scene scale?
- Surface: Are UVs usable? Are material slots separated logically? Are texture files available at suitable resolution, and can they be relinked outside the generating tool?
- Motion: Does the character have a documented skeleton, sensible bone names, usable skin weights, and animation clips that can be inspected separately?
- Scene structure: Are buildings, doors, foliage, props, collision objects, sockets, and level-of-detail meshes separate where production requires them to be?
- History and parameters: Is the native procedural setup available, or only a baked result? A baked mesh may still be editable, but the original generation controls may not be portable.
This distinction prevents a common evaluation mistake. “The file opens in a 3D editor” proves basic access; it does not prove that the topology, rig, materials, hierarchy, and metadata are suitable for continued production.
What can normally move into a game engine
Mainstream engines generally ingest standard asset categories such as meshes, textures, materials, skeletal animation, audio, and scene data through supported import formats. In practice, teams often exchange 3D meshes and animation through FBX or glTF, use PNG or other texture formats for images, and rebuild engine-specific materials, collision, lighting, and gameplay behavior after import.
That handoff is not lossless by default. A format can carry geometry while omitting a generator's procedural graph. Material nodes in a digital content creation application may not map one-for-one to an engine shader. Constraints, modifiers, particles, hair systems, custom attributes, and simulation caches may need baking, conversion, or manual reconstruction. Even when a scene format stores many of those features, the receiving importer may interpret only a subset.
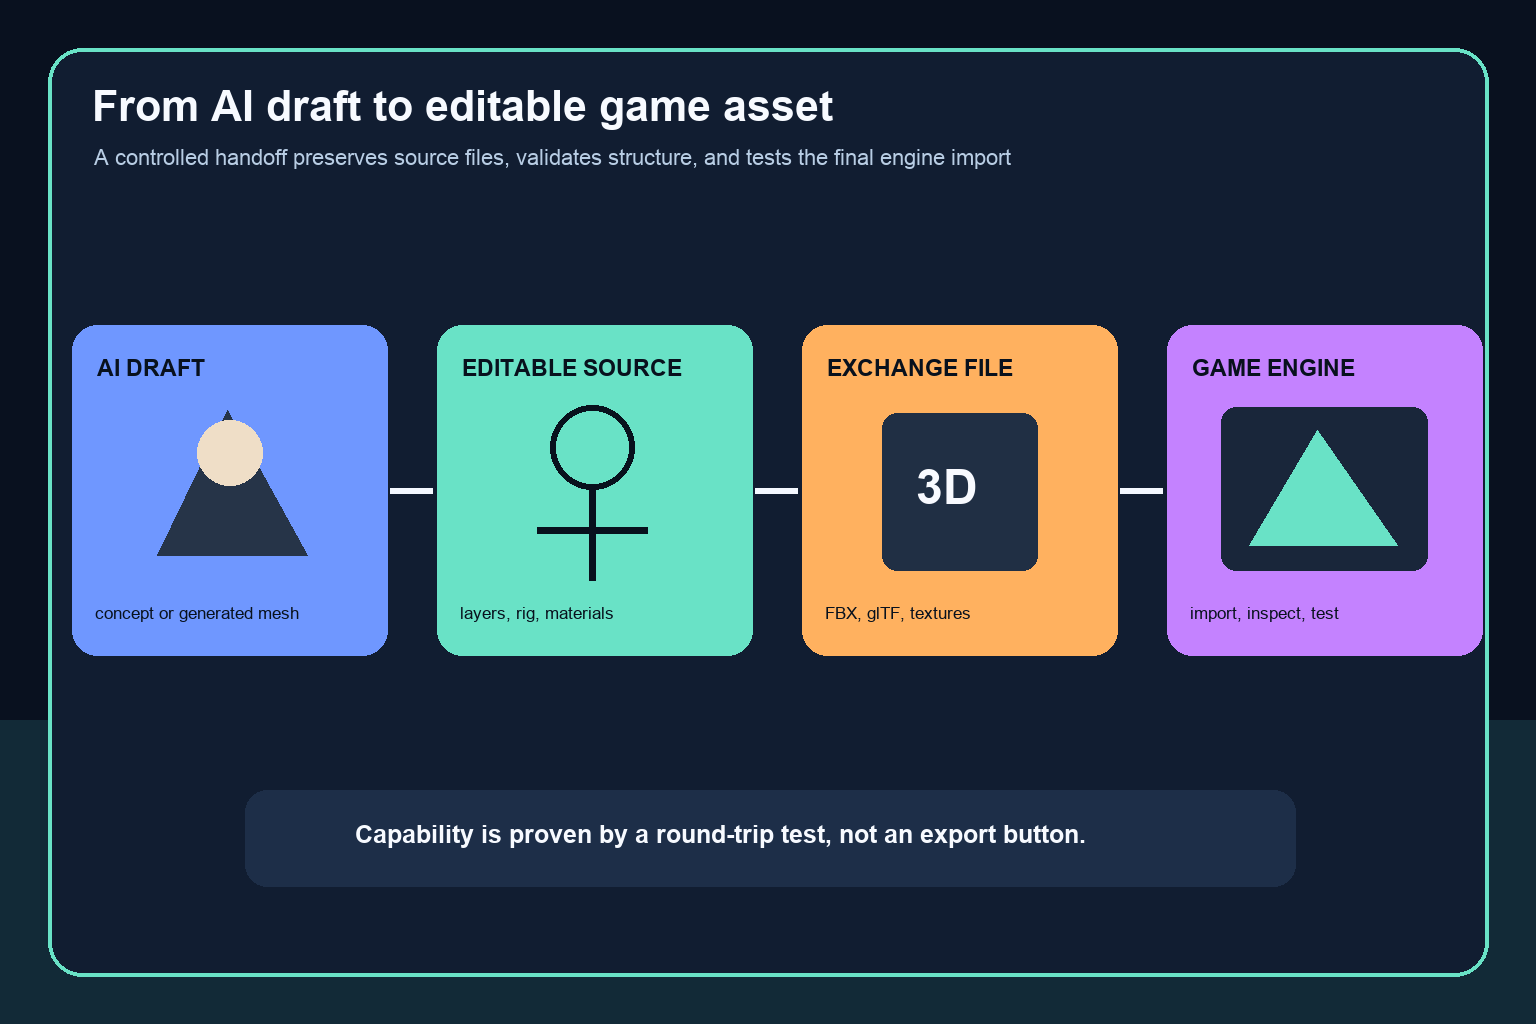
The important capability question is therefore not simply “Does it export FBX?” Ask what survives the round trip:
- mesh objects, object names, pivots, transforms, units, and coordinate axes
- UV sets, vertex colors, normals, tangents, and material assignments
- texture files, color-space expectations, and channel packing
- skeleton hierarchy, bind pose, skin weights, morph targets, and animation clips
- cameras, lights, collision shapes, sockets, level-of-detail groups, and custom metadata
- licenses and provenance records associated with the source and generated result
Export support should be verified against the particular asset type and engine version you plan to use. A tool may export static props successfully but require extra work for characters, foliage, terrain, or modular scenes.
Preserve an editable master and an engine derivative
Use two related files rather than expecting one file to serve every stage. The editable master belongs in a digital content creation application such as a 2D editor or 3D package. It preserves the highest-value structure you actually received: source layers, separate meshes, high-resolution textures, rigs, modifiers, procedural controls, and notes about generation settings.
The engine derivative is optimized for runtime and import reliability. It may have frozen transforms, triangulated or simplified geometry, baked texture maps, compact material slots, selected animation clips, generated collision, and level-of-detail variants. Changes should normally flow from the master to a new derivative rather than from repeated destructive edits to the imported engine copy.
This separation helps when requirements change. An environment artist can adjust proportions in the master, rebake maps, and replace the derivative without discarding the original high-detail data. A character artist can repair weights or rename bones once, then export predictable clips. The engine project remains a consumer of tested assets rather than the only archive of production work.
Version both sides of the handoff. Record the source file version, exporter settings, format version where relevant, engine import preset, texture conversion rules, and known exceptions. A generated result may never be perfectly reproducible after a model update, so preserving accepted source data is especially important.
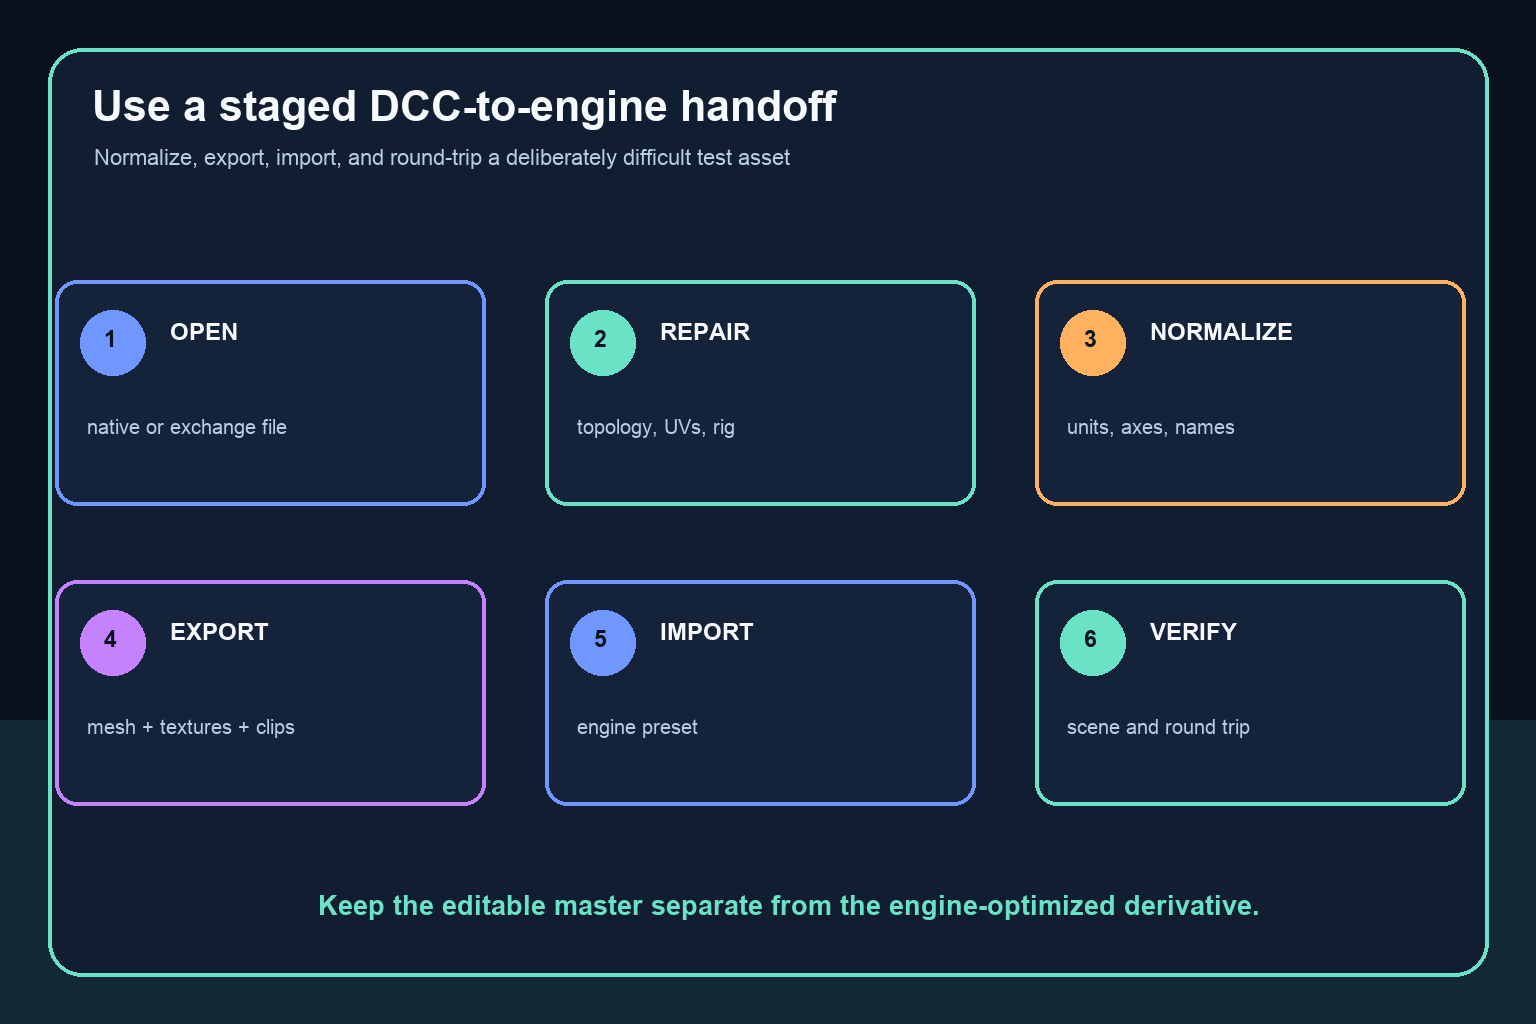
A practical DCC-to-engine workflow
Start with one representative asset that includes the difficult features you expect in production. A hero character with hair, transparent materials, facial shapes, and multiple animations is more informative than a rigid crate. For an environment, choose a modular room or building section with multiple materials, repeated pieces, collision needs, and a known scale reference.
1. Acquire the most structured output available
Prefer a documented native source or a standard exchange file over a rendered preview. Download textures as separate files rather than relying on temporary links. Capture the license, tool version, generation settings, and any declared limitations. If only a flattened image or baked mesh is provided, plan edits around that limitation instead of assuming hidden source layers exist.
2. Inspect and repair in a DCC tool
Open the asset outside the generator. Check for non-manifold geometry, overlapping faces, extreme polygon density, inconsistent normals, unusable UV islands, hidden objects, duplicate materials, and incorrect scale. Pose a character at joint extremes to expose weight problems. For modular environments, snap pieces together and inspect seams from gameplay distance.
Do not “clean” everything automatically. Preserve details that are intentional, and make a copy before destructive operations. The goal is predictable editing and export, not a theoretically perfect mesh.
3. Normalize production conventions
Apply your naming rules, unit scale, axis convention, pivot placement, texture naming, material limits, skeleton policy, and scene hierarchy. Separate engine-owned features from art-owned features. Collision, navigation, interaction sockets, and level-of-detail setup may be authored in the DCC tool, generated on import, or created in the engine; choose one authority for each feature.
4. Export a controlled derivative
Use a saved export preset instead of relying on memory. Export only the required objects. Bake procedural materials or animation where portability requires it, but retain the unbaked master. Check whether texture files are embedded, copied beside the model, or referenced by path. Relative, packaged paths are usually easier to move between machines than personal absolute paths.
5. Import into a clean engine project
A clean test project separates asset issues from existing project configuration. Use the target engine's documented importer and record every warning. Check unit scale, orientation, shading, texture color space, transparency, material count, skeleton mapping, root motion, animation timing, collision, bounds, and level-of-detail transitions.
Then place the asset in a simple playable scene. View it under representative lighting, from the expected camera, at the intended distance, and on the target performance tier. A visually correct importer preview can still hide bad collision, expensive materials, excessive draw calls, or animation problems.
6. Perform one round-trip change
Make a meaningful edit in the master: change a costume proportion, move a doorway, replace a material, rename an animation, or adjust a pivot. Re-export and update the engine asset. If references break, materials duplicate, skeletons remap, or scene placement shifts, the workflow is not ready for production even though the first import looked successful.
Test characters and environments differently
Characters stress the animation pipeline. Validate skeleton orientation, bone hierarchy, bind pose, skin weights, facial shapes, accessory attachment points, animation clip boundaries, root motion, and retargeting needs. Hair, cloth, and transparent surfaces often require special handling. A character that looks correct in a static pose may fail once elbows bend, facial shapes combine, or animation transitions play.
Environments stress scale, modularity, materials, hierarchy, and runtime construction. Validate grid dimensions, pivots, snapping, repeated materials, texture density, collision, lightmap or lighting needs, occlusion assumptions, level-of-detail behavior, and the cost of repeated objects. Large generated scenes may be better treated as references or split into controlled modules than imported as one monolithic object.
For both categories, separate visual approval from technical approval. An attractive result can still be expensive to fix. A plain-looking test asset with clean structure may be more valuable evidence of pipeline capability.
Common failure modes and their remedies
Only a rendered image is available. Use it as concept art, a paint-over base, or a texture source when rights permit. Do not plan rig, topology, or procedural scene edits around a flat image.
The mesh is editable but poorly structured. Budget retopology, object separation, UV repair, and material cleanup. Compare that effort with rebuilding from the concept rather than assuming repair is always faster.
The asset imports but looks different. Check normals, tangents, texture color space, transparency mode, channel packing, and the difference between source shaders and engine shaders. Rebuild the material using the engine's own system when necessary.
The rig works only in the source tool. Bake supported animation, simplify unsupported constraints, verify the bind pose, and test a known clip after import. Retargeting may require a skeleton mapping or an artist-authored intermediate rig.
The scene loses behavior. Gameplay logic, procedural systems, navigation, physics settings, and interactive scripts are usually engine-specific. Treat visual asset export separately from game behavior unless the platform documents a supported project-level transfer.
Licensing is unclear. Stop before production use. Confirm rights for source inputs, generated outputs, redistribution inside a game, marketplace resale if relevant, and any attribution requirements. Technical exportability does not establish legal permission.
A capability test before you commit
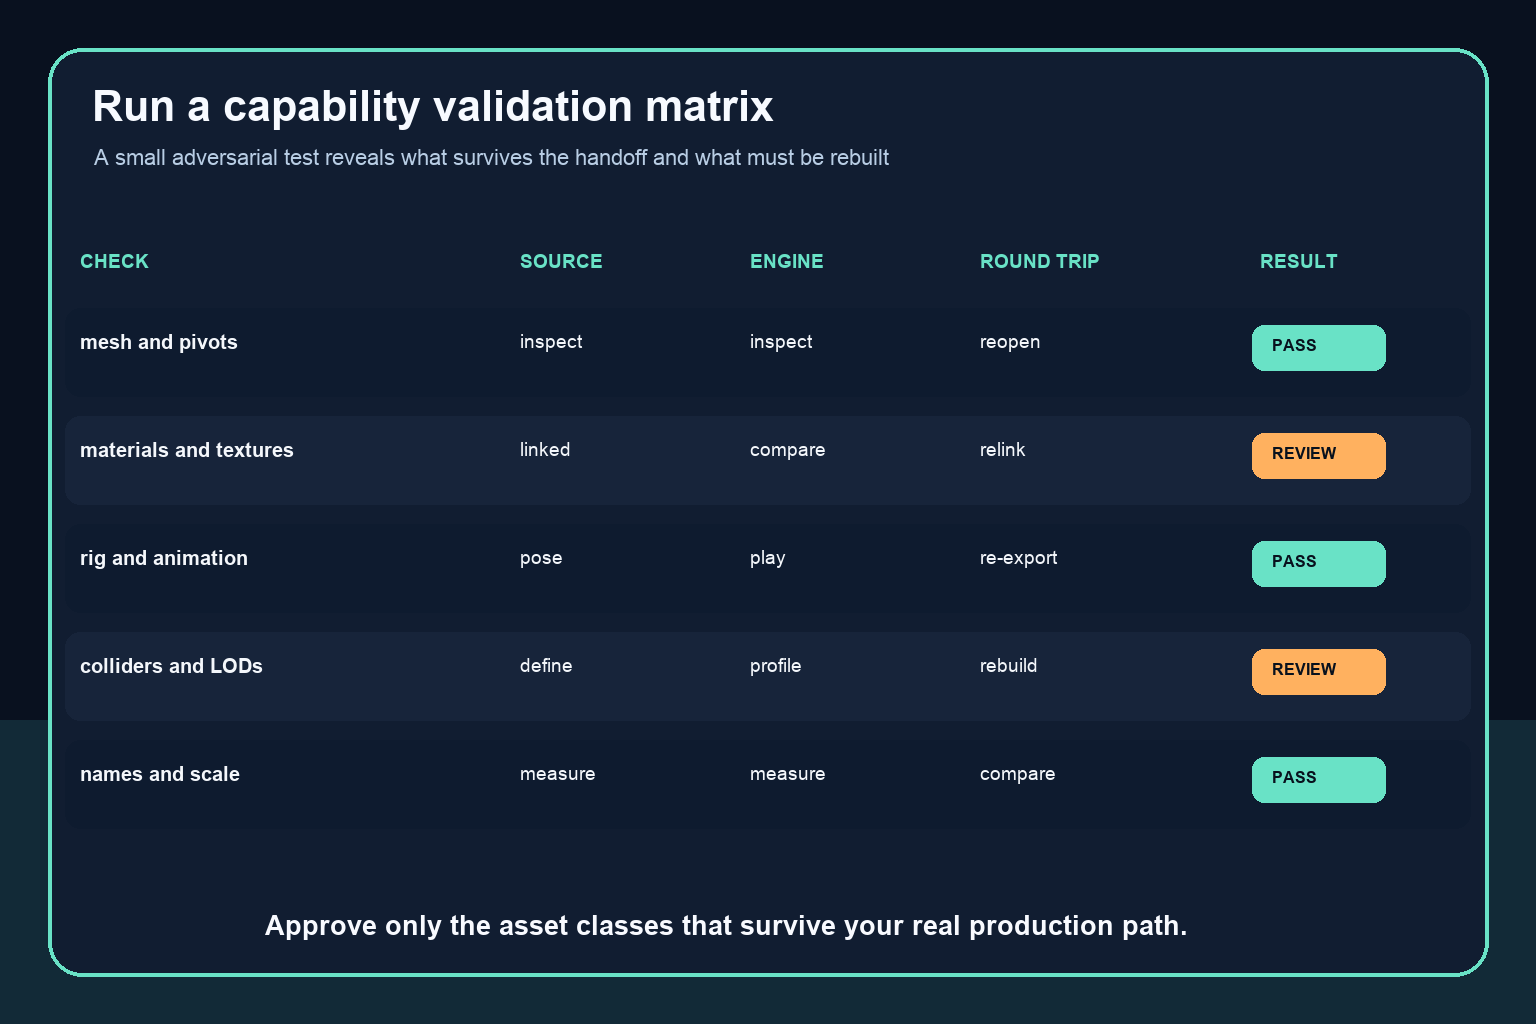
Build a one-day or two-day validation matrix for each important asset class. Choose a static prop, a skinned character, and a modular environment section if all three matter to the project. For each, score source editability, export completeness, engine import quality, round-trip stability, cleanup time, and unresolved risk.
Set acceptance criteria before running the test. For example: scale remains correct; pivots do not move; material assignments remain stable; textures relink without personal paths; the character plays three stress animations; collision matches the visible form; a source edit can replace the engine asset without breaking references; and cleanup time is lower than the production time saved.
Record pass, revise, or reject with evidence. A failed character test does not necessarily invalidate the platform for props or concept art. Narrow the approved use to the asset classes that survive the real path. This is more reliable than treating one successful showcase export as proof that every generated result is production-ready.
Decision: is the workflow suitable for a regular engine?
Approve the workflow when it provides enough source structure for your intended edits, exports the required asset data through a supported format, survives the receiving engine's importer, and remains stable after a round-trip change. Also confirm that cleanup cost, runtime performance, and usage rights meet the project's constraints.
Use AI earlier in the pipeline when those conditions are not met. Generated characters and environments can still be valuable for mood exploration, shape studies, paint-overs, blockouts, texture ideation, or modeling reference. The practical answer is not a universal yes or no: many AI-assisted assets can enter a standard game pipeline, but production readiness must be demonstrated per asset class, format, and engine configuration.
Frequently Asked Questions
Can I edit an AI-generated character after downloading it?
Sometimes. A structured 3D file may allow mesh, material, rig, and animation edits, while a flattened image allows pixel editing but does not preserve those structures. Inspect the delivered files rather than relying on the word “editable.”
Which export format should I use for a game engine?
Use a format supported by both your source application and target engine for the features you need. FBX and glTF are common 3D exchange choices, but their handling of materials, animation, custom data, and scene features differs. Run a representative import test.
Will materials look identical after export?
Not necessarily. Source shader graphs and engine shaders often differ. Texture maps and basic assignments may transfer, while procedural nodes, transparency, channel packing, and advanced effects may require baking or manual reconstruction.
Can I export a generated character with its rig and animations?
It may be possible when the delivered asset contains a usable skeleton, weights, bind pose, and supported animation data. Test extreme poses, clip timing, root motion, facial shapes, and a round-trip edit before approving the pipeline.
Can a whole AI-generated environment be imported as one scene?
A scene may import, but one large object is often difficult to edit, optimize, collide, stream, and reuse. For production, split environments into controlled modules with documented scale, pivots, materials, collision, and level-of-detail rules.
What usually fails when moving AI assets into an engine?
Common problems include poor topology, broken normals, missing UVs, incompatible shaders, wrong scale or axes, fragile rigs, lost constraints, absolute texture paths, missing collision, and engine-specific behavior that was never part of the export.